12d Synergy Fundamentals – 12d Synergy 101 Training Series – Part 2

This is the second article in our six-part training series that will quickly transform you from an average Joe into a 12d Synergy pro! Join Tim Brooks – a civil designer with 21 years’ experience – as he walks you through easy-to-follow videos on the fundamentals of 12d Synergy. New to the series? Catch up on part one to learn the importance of data management.
Each subheading will feature a 12d Synergy onboarding fundamental and accompanying timestamps to link you with the video walkthrough. Like the first act of a good play, this part sets you up for an easy transition into 12d Synergy. Enjoy!
Watch: 12d Synergy Training Series – Video 2 – Client Basics
The Fundamentals of Operating 12d Synergy
Logging into 12d Synergy and Finding Your Data
The first step to using 12d Synergy is learning how to connect to your server (0:28). Connecting to your server is like putting your feet in the water when you first learn how to swim.
1. Launch 12d Synergy from the icon on your desktop.
2. For first time users, you’ll be asked to connect to your server. Your system admin will provide you with your server address (future logins will automatically launch your recent job history and pre-connect your server).
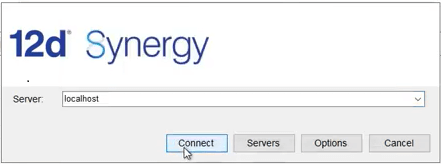
3. Once you’re in your server, this will automatically open the ‘Find a Job’ panel.
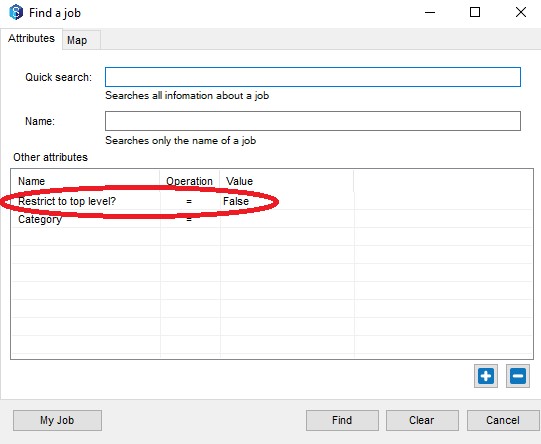
Step two involves finding your data. Data in 12d Synergy is logically grouped under ‘Jobs’ (2:55). Jobs take the form of overarching projects, like the groupings of different swimming strokes. Each job includes tasks, forums and a folder structure of files.
1. In the job panel, under ‘Other Attributes’ change ‘Restrict to top level’ to ‘False’ and then click ‘Find’ to view all the jobs you have access to.
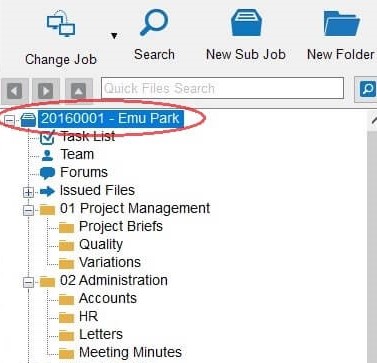
2. To change Jobs or servers, simply select this same ‘Change Job’ icon located on the ribbon bar, search for a server address and press ‘Connect’.
![]()
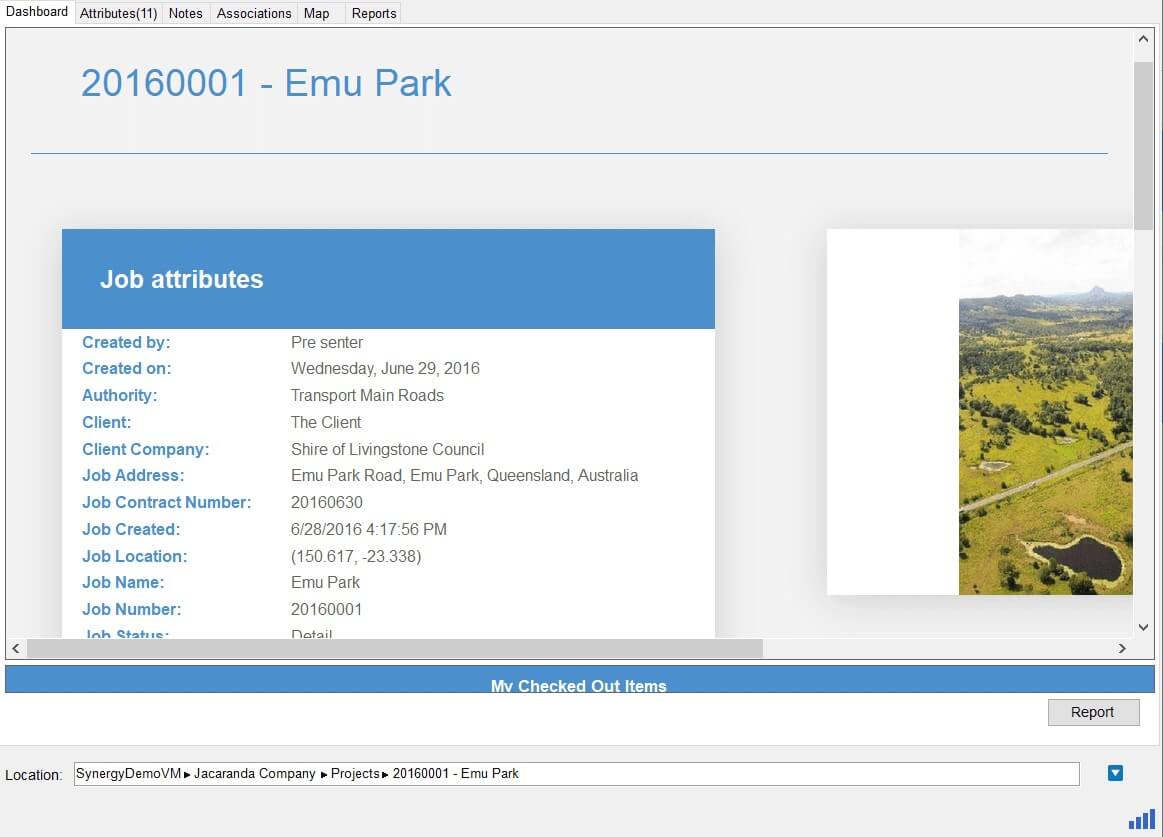
3. To get a bird’s-eye view of a job, open your client dashboard by clicking on the job.
Understanding the 12d Synergy display is the third step to instant data access and efficient navigation. It’s the compass that guides you through mountains of data.
1. Your Dashboard is a personalised homepage. Its purpose is to link you to your recent files, notify you of tasks and enable job shortcuts (4:16)
2. Your Job Tree is effectively the contents page of your project portfolio (5:18) Its purpose is to streamline your workflow by quickly linking you to your folders, files and tasks.
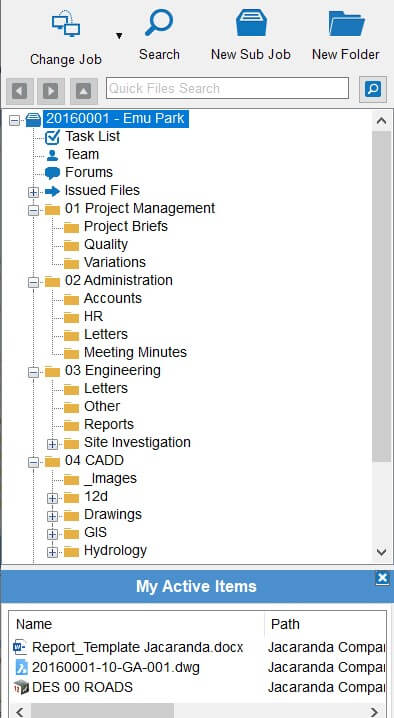
If you’re ever lost, just refer to either your dashboard or job tree and they’ll set you back on your course. Amidst the mountains of data, they’re your guide maps – your beacons calling you home.
File Management Basics
At the crux of 12d Synergy is file and folder management. This is the fourth step, flexibly moving around your files and folders. It’s like learning how to hike between the rocky data mountains. Understand this and you’re well on your way to smart and efficient data management. Each of these features can be located in the ribbon bar below.
![]()
 1. Folders and Files can be created through the ‘New Folder’ and ‘New File’ icon located on the ribbon bar. Files can also be created and uploaded through simply dragging and dropping from Windows (9:19)
 2. File Checking In and Out prevents duplication of two users editing the same file at the same time. Think of it like checking in and out of a hotel, it prevents the disaster of double booking (and having to share a room with a stranger). When checking out a file, other users can only access it in a ‘read only’ mode. Once checked back in, it’s available to be checked out and edited by other users (18:20)
 3. Data Attributes are additional pieces of information like the subject, sender and receiver date for an email. Find the attributes tab in your dashboard to access a full list of your predefined administrative attributes (27:23)
![]() 4. 12d Synergy keeps track of all the changes made to files which can be reviewed through file History. Each time a user updates a document, they will be prompted to describe what they have done. Like leaving a trail of breadcrumbs through your data mountain voyage, you can easily rollback to a previous version of files (31:45)
4. 12d Synergy keeps track of all the changes made to files which can be reviewed through file History. Each time a user updates a document, they will be prompted to describe what they have done. Like leaving a trail of breadcrumbs through your data mountain voyage, you can easily rollback to a previous version of files (31:45)
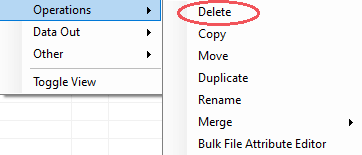
5. Files are never permanently deleted from 12d Synergy unless enabled by the system administrator. Instead, files are rendered as hidden until restored. This restricts files from being accidentally lost. Your breadcrumbs are always safe. To delete files, right click on the selected file, hover over Operations and then select Delete. To view deleted files, click View on your top tool-bar and select Show Deleted Files on the drop down menu (35: 33)
Okay. You’re all set, you can now confidently guide your way through 12d Synergy. Nice!
Find out how to unlock the art of efficient file and job searching and conquer more data mountains in the next part of the series!
Continue to Part 3: Searching 12d Synergy
Want to continue mastering your 12d Synergy training? Click here to read part 3 and learn how to become a 12d Synergy searching wizard.
Have Any New Team Members Learning the 12d Synergy Ropes?
Share this series! Unlike an IKEA instruction manual, this series will help you every step of way and is the ideal onboarding guide for new office members.
Want to put an end to your data management mayhem? Learn more about efficient data management with 12d Synergy, in our free eBook: Ending Document Management Mayhem

Find out more about document management and quality assurance management in our free eBook